

Cleaning the filter in your KitchenAid dishwasher is A crucial maintenance task that helps ensure your dishwasher operates efficiently and keeps your dishes clean. Over time, food particles, debris, and residue can accumulate in the filter, leading to clogs and reduced performance. In this guide, we’ll walk you through the steps to clean the filter in your KitchenAid dishwasher, helping you maintain the appliance and extend its lifespan. Regularly cleaning the filter will not only improve dishwasher performance but also result in cleaner and more hygienic dishes.
The specific steps and location Of the filter may vary depending on the model of your KitchenAid dishwasher, So refer to your dishwasher’s user manual for model-specific instructions. Generally, the Following steps should apply to most KitchenAid dishwashers:
1. Remove The Bottom Rack

One often overlooked but crucial step in maintaining your KitchenAid dishwasher is removing the Bottom rack. While it may seem like a trivial task, removing the bottom rack actually plays A significant role in ensuring your dishwasher operates at its best. Not only does removing the rack provide easier access to hard-to-reach areas Of your machine, But it also allows you to effectively clean the filter.
To remove the bottom rack, simply slide it all the way out until it is fully extended. Then lift upwards at both sides simultaneously to detach it from its rails. With this simple maneuver, You gain access to not just your filter but also to other hidden compartments where grime can accumulate over time.
2. Locate The Dishwasher Filter

Cleaning the filter on your KitchenAid dishwasher is an essential maintenance task that should not be overlooked. The strainer plays a vital role in preventing food particles, debris, And other residues from clogging the dishwasher’s pump and spray arms. But where exactly is this mysterious filter located? Many people are unaware Of its existence or simply have trouble finding it.
To locate the dishwasher filter, you need to start by removing the bottom dish rack to access the lower part of the machine. Once exposed, take a closer look at the bottom Of the tub, Near the back wall. You will likely notice a cylindrical or rectangular component with A round handle or knob attached to it. This is your dishwasher’s filter! Hold onto that handle and gently turn it counterclockwise to unlock And remove it for cleaning purposes.
3. Remove And Rinse The Filter
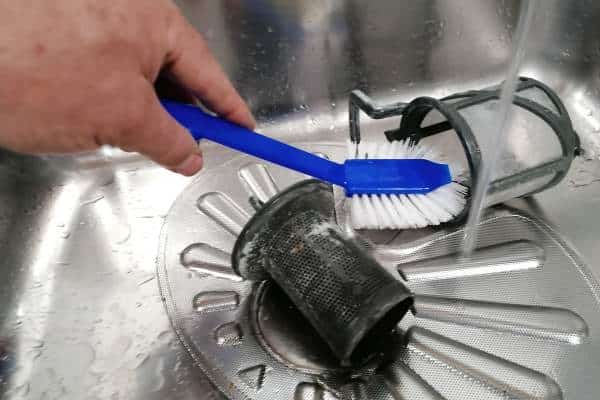
One of the essential maintenance tasks for A KitchenAid dishwasher is removing and rinsing the filter. This simple task ensures optimal performance and efficiency of your appliance. Start by locating the strainer, Usually at the bottom of the dishwashers, near the sprayer arm. Gently detach it from its position, Following any instructions specific to your model.
Once removed, take A moment to inspect the filter carefully. Often covered in food debris and residue, this accumulation can compromise your dishwasher’s effectiveness over time. Rinse off any remaining particles under running water, Using a soft brush or toothbrush to dislodge stubborn dirt if necessary. Then, examine every part Of the strainer meticulously before safely placing it back into its original position.
4. Clean Any Debris From The Spray Arm

Another crucial maintenance task for your KitchenAid dishwasher is to clean any debris from the spray arm. Over time, food particles and mineral build-up can clog the small holes in the Spray Arm, preventing it from properly distributing water during the wash cycle. This can result in poor cleaning performance and even leave behind residue on your dishes.
Most models have A simple twist-lock mechanism that allows you to easily detach it. Once you have removed the spray arm, rinse it under running water and inspect for any clogs or obstructions. Use a toothbrush or small Brush to gently scrub away any debris that may be stuck in the holes. After cleaning, reattach the spray arm securely back into place.
5. Inspect The Filter Housing

To inspect the filter housing on your KitchenAid dishwasher’s, start by removing the lower rack to access the strainer area. Take a close look at the strainer cover – if you notice any cracks or damage, It may be necessary to replace it to maintain efficient filtration. Next, remove any large pieces Of food debris or foreign objects that might have accumulated in the strainer area. Gently clean both sides Of the filter using warm soapy water or A mixture of vinegar and water to remove any stubborn Build-up.
By taking these simple steps to clean your KitchenAid dishwasher filter housing regularly. You not only ensure clean dishes but also avoid unnecessary repairs down-the-line. Moreover, it allows for proper water circulation during wash cycles, providing better results with fewer streaks or spots on glassware-maintaining their shine for longer periods.
6. Reassemble And Replace

Replacing the filter is a fairly simple process that can greatly improve the performance of your dishwasher.
In addition to improving cleaning performance, replacing your dishwasher’s strainer can also help prolong its lifespan. A clogged or dirty strainer puts extra strain on other parts Of the machine and can lead to premature wear and tear. By regularly checking and replacing the strainer as needed. You not only ensure optimal cleaning results but also save yourself from costly repairs down the line. So don’t underestimate this small yet important component – give your KitchenAid dishwashers some love by reassembling and replacing its filter!
7. Reinstall The Bottom Rack

Reinstalling the bottom rack in your dishwasher may seem like a simple task, But it is essential for efficient dishwashing. Whether you are cleaning up after A dinner party or tackling daily loads, properly reinstalling the bottom rack ensures that your dishes come out sparkling clean every time.
To Begin, locate the tracks on each side of the dishwashers. These tracks serve as Guides for the bottom rack and Allow it to slide in and out smoothly. Make sure these tracks are clean and free from any debris that could obstruct movement. Once clean, simply align the wheels on each side Of the rack with the tracks and push it back into place with A firm but gentle push.
8. Run A Test Cycle To Ensure Proper Functioning

Once you have thoroughly cleaned the filter on your KitchenAid dishwasher, it’s crucial to run a test cycle to ensure that everything is functioning properly. The test cycle will help you identify any potential issues before they become major problems. Start by selecting the shortest possible cycle and Allow the dishwashers to run through its entire duration. Observe how the water Flows, if there are any unusual noises, Or if any error messages appear on the control panel.
During the test cycle, pay close attention to how well your dishes come out at the end. Are they still dirty or are they sparkling clean? If you notice any residue or food particles left behind, it could be a sign that there is A blockage somewhere in the system. Additionally, check for leaks underneath or around the dishwashers during this test cycle as even minor leaks can lead to significant damage over time. By running this simple yet essential test cycle after cleaning the filter. You will ensure that your KitchenAid dishwasher continues to provide efficient and effective cleaning for all your dishwashing needs.
How Can I Reach The Filter In My KitchenAid Dishwasher?
To access the filter, typically Follow these Steps:
- Turn off the dishwasher.
- Remove the lower rack.
- Access the filter by removing any components covering it, like a spray arm or a cover.
- Lift or twist the strainer to remove it from its housing.
Refer to your dishwasher’s user manual for model-specific instructions, As the location and design Of the filter may vary.
What Should I Use To Clean The Filter?
You can use a soft brush, A toothbrush, Or your hands to remove food particles and debris from the filter. Rinse it with warm, soapy water to remove any greasy residue.
How Often Should I Reset My KitchenAid Dishwasher Filter?
You should reset your Kitchen-Aid dishwasher filter every 6 months or as needed, depending on the level of dirt and debris buildup.
Conclusion
Keeping your KitchenAid dishwasher filter clean is essential for maintaining its optimal performance. By Following the Simple Steps outlined in this article, you can easily remove and clean the filter to ensure that it remains free from debris and buildup. Regular maintenance of the strainer will not only prevent clogs and malfunctions but also extend the lifespan Of your appliance. Refer to your dishwasher’s user manual for specific instructions related to your model, as features and filter designs may vary.