
Embarking on a kitchen renovation project can be both exciting and daunting. One of the first steps often involves removing the old to make way for the new, and this includes taking out the existing kitchen countertops. Whether you’re planning to update your space with a fresh design or simply want to replace worn-out surfaces, understanding how to remove kitchen countertops properly is crucial. This guide will walk you through the necessary steps, tools, and precautions to ensure that the removal process is smooth and safe. From preparing your workspace to dealing with different types of countertop materials, we’ll cover everything you need to know to get your kitchen ready for its transformation. So, let’s roll up our sleeves and dive into the world of kitchen renovations!
How do I know if it’s time to remove my kitchen countertop?
Knowing when it’s time to remove your kitchen surface is essential for maintaining the functionality And aesthetics Of your kitchen space. Several signs may indicate that it’s time for A worktop replacement. Firstly, Visible signs Of wear And tear such as cracks, Chips, Or stains that are beyond repair may warrant countertop removal. Additionally, If your counter material has become outdated or no longer aligns with your design preferences, It may be time for an upgrade. Functional issues such as water damage, Mold growth, Or structural instability are also red flags that signal the need for counter-removal. Furthermore, If you’re undergoing A kitchen renovation project that involves replacing cabinets or appliances, Removing the desktop may be necessary to facilitate these changes seamlessly. By staying vigilant And addressing these signs promptly, You can ensure that your kitchen remains both functional And visually appealing for years to come.
Can I remove my kitchen countertop without professional help?
Removing your kitchen countertop without professional help is indeed possible, But it requires careful planning, The right tools, And A dose of DIY spirit. While hiring professionals can offer convenience And expertise, Tackling the removal yourself can be A rewarding project if approached methodically. Begin by assessing the type Of countertop material And researching the appropriate removal techniques. Gather essential tools such as screwdrivers, Pry bars, And utility knives, Ensuring you have proper safety gear like gloves And safety goggles. Follow step-by-step guides to understand the process thoroughly before starting. Take your time And proceed cautiously, Especially when disconnecting utilities And removing fixtures. With patience And attention to detail, You can successfully remove your kitchen bartop, Saving money on labor costs And gaining A sense Of accomplishment in the process. However, If you encounter challenges or feel uncertain, Don’t hesitate to seek professional assistance to ensure A smooth removal experience.
2. Assessing The Current Countertop
Before diving into the removal process, It’s imperative to conduct A comprehensive assessment Of the current countertop. This entails scrutinizing not only the type Of material used but also its overall condition. Whether it’s granite, Quartz, Laminate, Or another material, Understanding its properties And structural integrity is key to planning A successful removal. Additionally, Identifying any obstacles or challenges that may arise during the removal process is essential. These could include factors such as built-in appliances, Intricate trim or molding, Or the presence Of stubborn adhesive or caulking. By thoroughly evaluating the desktop beforehand, Homeowners can anticipate potential difficulties And devise strategies to address them effectively. This proactive approach not only streamlines the removal process but also minimizes the risk Of unexpected complications arising along the way. Ultimately, A comprehensive assessment sets the stage for A smooth And successful counter removal, Laying the groundwork for A successful kitchen renovation project.
3. Gathering Necessary Tools And Materials
As you embark on the journey Of removing your kitchen countertops, Ensuring you have the necessary tools And materials at your disposal is paramount. Essential tools for this task include screwdrivers, Pry bars, Dislodging adhesive, And dismantling any fixtures or trim. Additionally, It’s crucial to prioritize safety by donning protective gear such as gloves And safety goggles. By equipping yourself with the right tools And protective gear, You not only enhance efficiency And precision but also safeguard your well-being throughout the project. As you gather these essential supplies, Take A moment to familiarize yourself with their proper usage And handling, Ensuring A Smooth And successful countertop removal experience. With the right tools And safety precautions in place, You’ll be well-prepared to tackle this renovation task with confidence And ease. We will share some brilliant kitchen countertop organizer ideas that will revolutionize your culinary haven.
4. Turning Off Utilities And Disconnecting Appliances
Before you begin the process Of removing your kitchen countertops, It’s crucial to take the necessary steps to ensure safety And prevent potential damage. Start by shutting off the electricity And water supply to the kitchen area. This precautionary measure helps mitigate the risk Of electrical hazards during the removal process. By cutting off the power And water sources, You create A safer working environment for yourself And anyone else involved in the project. This includes items such as sinks, Faucets, And cooktops, Which may need to be removed before the surface can be lifted away. Taking the time to properly disconnect these components ensures A smoother And more efficient removal process, Minimizing the risk Of damage to both the countertop And the surrounding area. By adhering to these important steps, You can proceed with confidence, Knowing that you’ve taken the necessary precautions to facilitate A successful worktop removal.
5. Removing fixtures And Trim
As you prepare to remove your kitchen countertops, It’s essential to begin by addressing fixtures And trim that may be attached to the surface. Start by unscrewing And removing sink faucets, Handles, And any other accessories that are affixed to the countertop. These fixtures can obstruct the removal process And may risk damage if left in place. Taking the time to carefully detach them ensures A smoother And more efficient removal process. Additionally, It’s important to detach any trim or molding surrounding the counter edges. This trim not only adds aesthetic appeal but may also serve to protect the countertop edges. By carefully removing it, You can access the countertop more easily And ensure A cleaner removal process overall. Taking these steps to address fixtures And trim sets the stage for A successful surface removal, Laying the groundwork for A smooth And efficient renovation process.
6. Loosening And Removing Fasteners
Once fixtures And trim have been removed, The next step in the vanitytop removal process involves addressing the fasteners securing the countertop to the cabinets below. These fasteners may be located along the underside Of the desktop or inside cabinets And may require A screwdriver or wrench for removal. Be sure to keep track Of these fasteners as they are removed, As they will need to be reinstalled when the new counter is installed. In addition to screws And bolts, Many countertops are also secured in place with adhesive or caulking. To address this, Use A pry bar or utility knife to gently loosen the adhesive along the edges Of the desktop. Take care not to apply too much force, As this can damage the cabinets or the countertop itself. By carefully loosening the adhesive, You can gradually detach the surface from the cabinets, Making it easier to lift away.
7. Unscrew And Pry Countertops From Cabinets
Checking underneath your kitchen cabinets is A crucial step in the process Of removing your countertop. If you discover that your countertop is secured in place with screws, A screwdriver can be used to unfasten them, Allowing you to lift the countertop without causing damage to your cabinets. However, Countertops may also be held in place with brackets, nails, Or additional adhesive. In such cases, A pry bar can be utilized to gently lift the countertops from under the rim, Starting from one end and working your way to the other. It’s important to exercise patience And refrain from applying excessive force on the pry bar to prevent any potential damage to both the surface And the cabinets. By following these careful steps, You can ensure A safe And successful removal Of your kitchen worktop without compromising the integrity Of your cabinets.
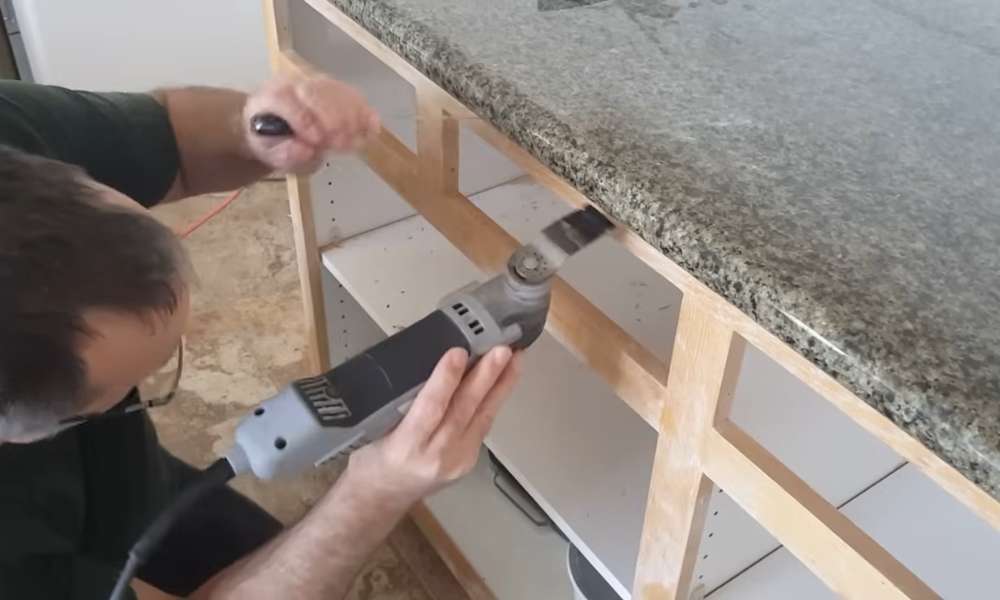
8. Break The Silicone Adhesive Bond
When removing A kitchen bartop, It’s common to encounter silicone adhesive securing it in place. To effectively detach the counter without causing damage, Begin by carefully cutting the silicone adhesive between the cabinet And countertop using A razor knife. Take care to avoid scratching or harming the front Of the cabinets during this process. Next, Position A paint scraper in the seam between the cabinets And countertop, Then gently tap it with A hammer. This action helps to break the adhesive seal, Making it easier to lift the countertop. Enlisting the assistance Of A friend to pull up the vanitytop can further facilitate this process, Reducing the effort required And minimizing the risk of damage. By following these steps diligently And employing caution, You can safely remove the countertop from your kitchen without compromising the integrity Of your cabinets or causing any unnecessary damage.
9. Cut The Silicone Adhesive
In the process Of removing A kitchen bartop, It’s essential to address the backsplash, Which is typically attached to both the wall And the countertop. Before attempting to pry up the desktop, It’s necessary to remove the backsplash. To accomplish this, Carefully cut along the entire edge Of the silicone adhesive between the wall And backsplash using A razor knife. This step ensures A clean separation And prevents any damage to the wall or backsplash during removal. By meticulously cutting through the adhesive, You can effectively detach the backsplash from both surfaces, Facilitating the subsequent removal Of the countertop. Taking the time to properly address the backsplash before proceeding with countertop removal is crucial for A smooth And successful process. It ensures that each component can be removed with precision And care, Minimizing the risk Of damage And ensuring A seamless transition to any renovation or replacement efforts.
10. Lifting And Dislodging The Countertop
As you approach the pivotal moment Of removing your kitchen countertop, It’s essential to exercise caution And precision to ensure A smooth transition. Begin by gently lifting the countertop, Taking care to avoid abrupt movements that could potentially damage surrounding surfaces or cabinets. Utilize proper lifting techniques And enlist the help Of others if necessary to evenly distribute the weight And minimize strain. Use gentle maneuvers And tools such as pry bars or putty knives to carefully work around avoiding excessive force that could lead to damage. By proceeding with care and mindfulness, You can navigate through these challenges with confidence, Ensuring that the counter is safely removed without compromising the integrity Of your kitchen space. Remember, Taking the time to lift And dislodge the surface thoughtfully And methodically can make all the difference in preserving the condition Of your kitchen And facilitating A successful removal process.
11. Cleaning And Preparing The Cabinet Base
Once the countertop has been successfully removed, The focus shifts to preparing the cabinet base for the installation Of the new surface. This step is crucial to ensure A smooth And level surface for the new countertop to be placed upon. Utilize tools such as scrapers or putty knives to gently scrape away any stubborn remnants, Taking care not to damage the cabinets in the process. With the adhesive or caulking removed, It’s time to turn your attention to cleaning the cabinet base thoroughly. Pay special attention to corners And crevices where buildup may accumulate. This meticulous cleaning process sets the stage for A seamless installation, Ensuring that the new countertop adheres securely And evenly to the cabinet base. By investing time And effort into preparing the cabinet base, You pave the way for A successful countertop replacement that enhances the aesthetic And Functionality Of your kitchen space.
12. Remove The Sink
Removing A sink from A kitchen bartop is A crucial step in the countertop removal process, Whether it’s a drop-in fixture or an undermount-style sink. Begin by disconnecting the drain lines to ensure A smooth removal process. Next, Inspect the underside Of the sink for any fasteners securing it to the worktop or cabinet frames And remove them using appropriate tools. A chisel knife can then be use to gently pry the sink away from the countertop, Taking care to avoid damaging the surrounding area. To facilitate easier removal, Consider spraying A caulk softener to loosen any dried adhesive or mortar under the rim. Finally, Lift the sink carefully, Ensuring it is fully detache from the countertop before proceeding with the counter removal. By following these steps meticulously, You can remove the sink from the desktop safely And efficiently, Paving the way for A successful surface replacement or renovation.
13. Disposing Of The Old Countertop
As you complete the removal process Off your old kitchen vanity top, It’s important to address the proper disposal If the discarded material. Many municipalities offer recycling programs for construction materials, Including countertops made Of materials such as granite or quartz. Research local recycling centers or facilities that accept such materials And inquire about their disposal procedures. Alternatively, You can arrange for the removal And disposal Of the old countertop through waste management services. Many waste management companies offer specialized services for the removal Of bulky, Including countertops. Contact your local waste management provider to inquire about their disposal options And schedule A pickup or drop-off for the old countertop. By exploring recycling options And utilizing waste management services, You can ensure that your old countertop is dispose Of responsibly And by environmental regulations. This not only helps minimize waste but also contributes to sustainability efforts within your community.
What tools do I need to remove a kitchen countertop?
Removing A kitchen surface requires specific tools to ensure the process is efficient And safe. Essential tools for this task include screwdrivers, Both flatheads And Phillips. A pry bar or crowbar will help loosen the countertop from its base, Especially if it’s secure with adhesive. A utility knife is handy for cutting through any sealant or caulk around the edges. Additionally, Having pliers on hand can aid in disconnecting plumbing connections or electrical wires if necessary. Protective gear such as gloves And safety goggles are crucial to safeguard yourself during the removal process. Depending on the countertop material And installation method, You may also need specialty tools like A reciprocating saw or A hammer And chisel for tougher removal jobs. By ensuring you have the right tools for the job, You can approach countertop removal with confidence And efficiency, Minimizing the risk Of damage And ensuring A successful outcome.
Are there any safety precautions I should take when removing a kitchen countertop?
When undertaking the task Of removing A kitchen vanity top, It’s crucial to prioritize safety to prevent accidents And injuries. Firstly, Wearing appropriate protective gear is essential. This includes sturdy gloves to protect your hands from sharp edges, Splinters, And potential cuts, As well as safety goggles to shield your eyes from flying debris or dust. Additionally, Ensure the work area is well-lit And ventilated to enhance visibility And minimize the inhalation Of dust particles. Take caution when handling heavy or bulky bartop sections to avoid strain or muscle injuries by enlisting the help Of A partner or using lifting aids if necessary.
When using tools such as screwdrivers, pry bars, Or utility knives, Always follow the manufacturer’s instructions And handle them with care to avoid accidental injuries. By adhering to these safety precautions, You can carry out the countertop removal process confidently And minimize the likelihood Of accidents or mishaps.
Conclusion
The process Of removing A kitchen desktop is A significant undertaking that requires careful planning, Preparation, And execution. By following the key steps outlined in this guide, including assessing the current countertop, Gathering necessary tools, Disconnecting utilities, Removing fixtures And trim, Loosening fasteners, Lifting And dislodging the countertop, Cleaning And preparing the cabinet base, And disposing Of the old counter. It’s essential to approach countertop removal with caution And precision to avoid damage to surrounding surfaces And fixtures. Additionally, Proper disposal Of the old countertop is crucial for environmental sustainability And responsible renovation practices. Whether opting for recycling or waste management services, Homeowners can take proactive steps to minimize waste And contribute to A greener future. By following these guidelines And encouraging responsible renovation practices, Homeowners can transform their kitchen spaces with confidence And ease, Knowing that they’ve taken the necessary steps for A successful surface removal project.